
Scheduled reporting
Overview
Scheduled reporting allows you to generate orders/transactions reports at specified intervals. These reports can be filtered to include only the information you want included.
Merchant Admin or Merchant Supervisor roles are required to set up a reporting schedule.
Create a scheduled report
To create a scheduled report, do the following:
-
Log in to your OnlinePay dashboard.
-
Navigate to Commerce > Reporting > Report Scheduler.
-
Click Schedule report to open the report scheduling form.
-
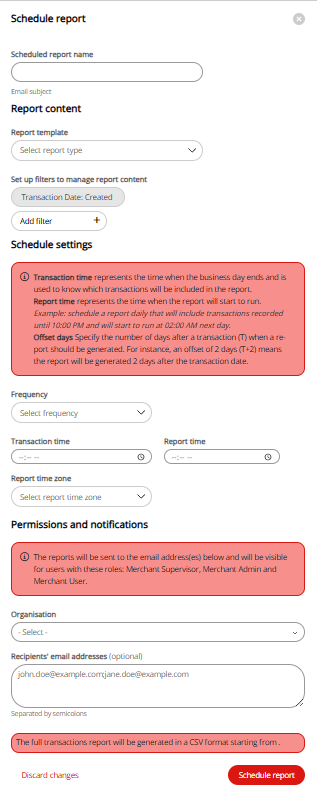
Complete the following details:
-
Scheduled report name: Enter a name for your scheduled report. This will be populated in the email subject of the report.
-
Report content: Select the report template you want to use for the scheduled report from the dropdown. You can select either one of the default templates (
Transaction report -FullorTransaction report -Basic) or a custom template you have created previously. See Customise a report template.If you were the one who created the custom template, you will be able to click
View report template detailsunder the selected custom template to view the details of the template.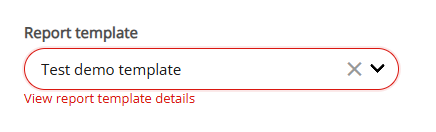
-
Set up filters to manage report content: Apply any of the following filters:
- Transaction date:
Created,Settled - Channel:
E-commerce,Mail,Phone,Point of sale - Wallet:
Apple Pay,Google Pay - Product: Card type
- Transaction type: Transaction types and states
- Transaction state: Transaction types and states
- Merchant ID: Search for the
Merchant IDor select theMerchant IDfrom the list. - Organisations: Search for the organisation by
Name,Organisation ID, orBusiness Identifier Valueor select the organisation from the list.
- Transaction date:
-
-
Configure the Schedule settings:
-
Frequency: Select how often you want the report to be generated (
Daily,Weekly,Monthly). -
Choose when the report should be sent.
- For daily reports, you can optionally specify a number of offset of days. Offset days is the number of days delay between the transaction date and the report generation date. You can offset between two and seven days. For example, if you were to create a daily report on a Wednesday to begin generating reports from the next day (Thursday), with an offset of three days, the report you receive on Thursday would include the transactions created on the previous Monday.
- Weekly reports can be generated on a specified day of the week. Choose the day you want to generate the report each week from the drop-down menu.
- Monthly reports can be generated on a specified day of the month. Choose the day you want to generate the report each month from the drop-down menu.
-
Transaction time: Specify the cutoff time for the transactions included in the report. Transactions that occur after this time will be included in the next report.
-
Report time: Specify the time of day you want the report to be generated. This is the time when the report will be compiled and emailed to the recipient/s (if email addresses are included in the scheduled report).
-
Report time zone: Select the UTC offset for the report time. This ensures that the report is generated and sent at the correct local time for the recipients (if email addresses are included in the scheduled report).
-
Permissions and notifications: Select the organisation/site to provide Merchant Supervisor, Merchant Admin, and Merchant Users access to the report in the dashboard.
Optionally, you can also provide email addresses for users to receive the report directly.
-
-
When you are finished, click Schedule report to create the scheduled report.
Generated reports can be viewed in the OnlinePay dashboard by users with appropriate permissions under Commerce > Reporting > Generated Reports after selecting the organisation or site from the drop-down.
Edit a scheduled report
You can edit an existing scheduled report to change the report details, reporting frequency, or recipients.
-
In your OnlinePay dashboard, navigate to Commerce > Reporting > Report Scheduler.
-
Locate the scheduled report you want to edit in the list of scheduled reports and click it to open the scheduled report details.
-
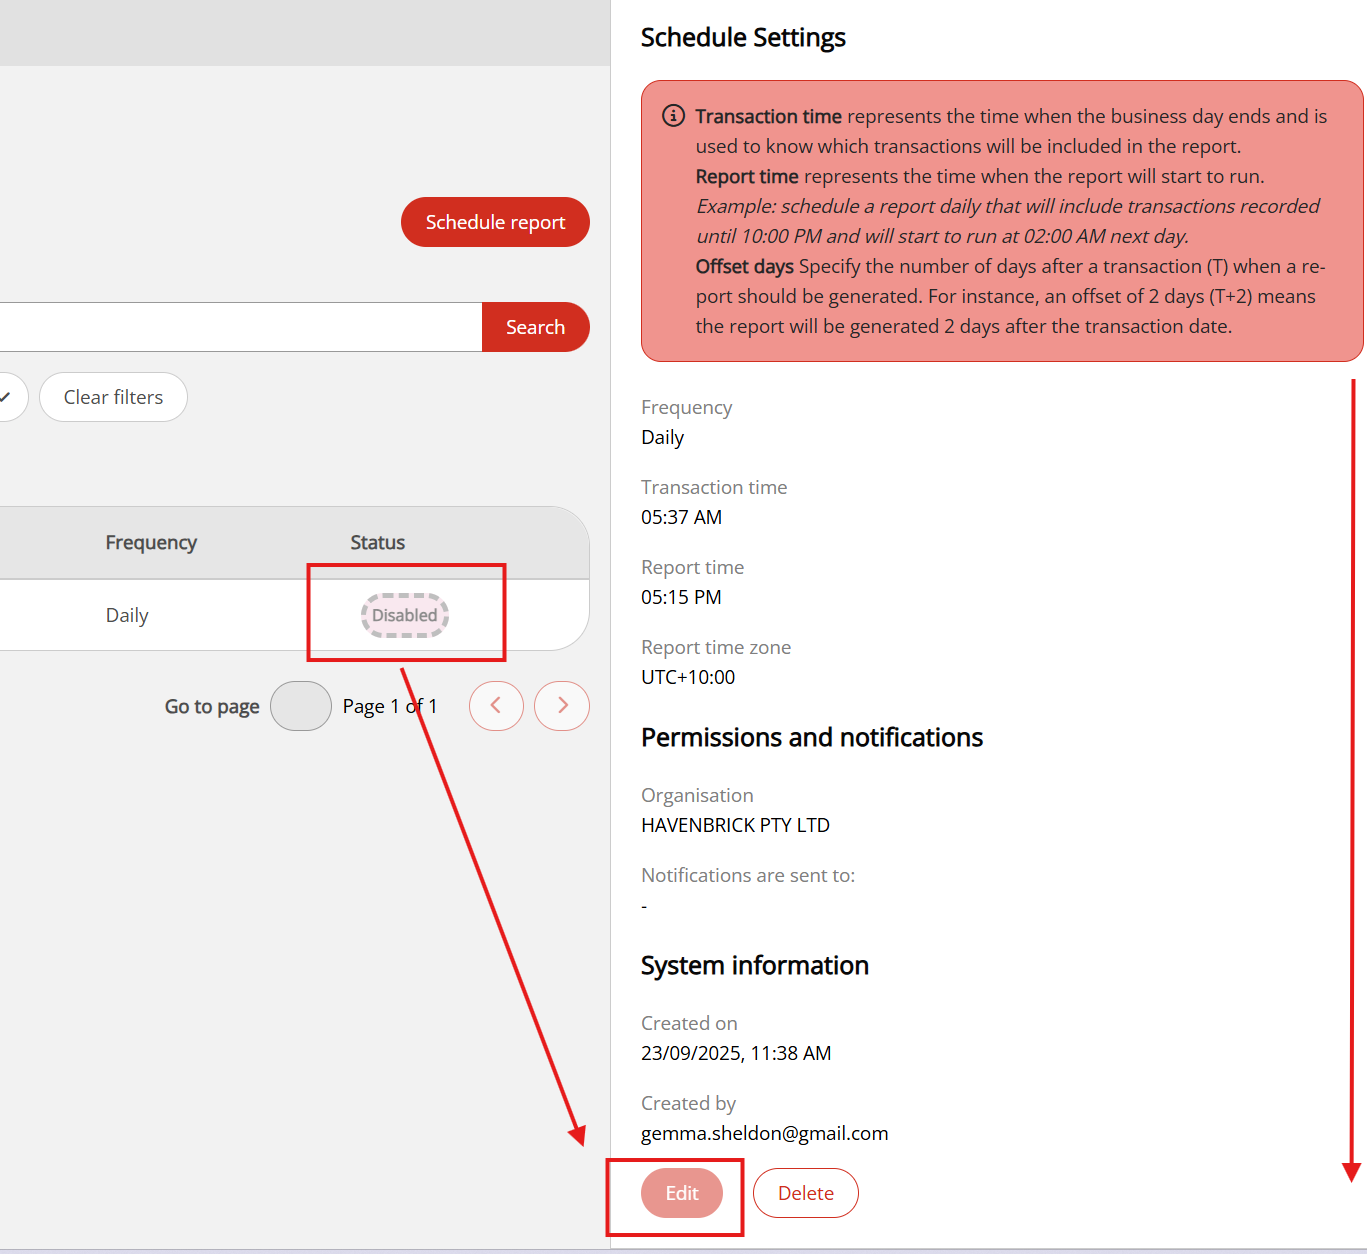
Scroll to the bottom of the page and click Edit. This will open the report scheduling form with the existing details populated.
-
Make the necessary changes to the scheduled report details.
-
When you are finished, click Save changes to save your changes, or Discard to cancel your changes.
Reports must be in an
Enabledstate to be edited.
Disable or enable a scheduled report
You can disable a scheduled report to stop it from being generated and sent. You can enable a disabled report to resume its generation and sending.
-
In your OnlinePay dashboard, navigate to Commerce > Reporting > Report Scheduler.
-
Locate the scheduled report you want to disable or enable in the list of scheduled reports and click it to open the scheduled report details.
-
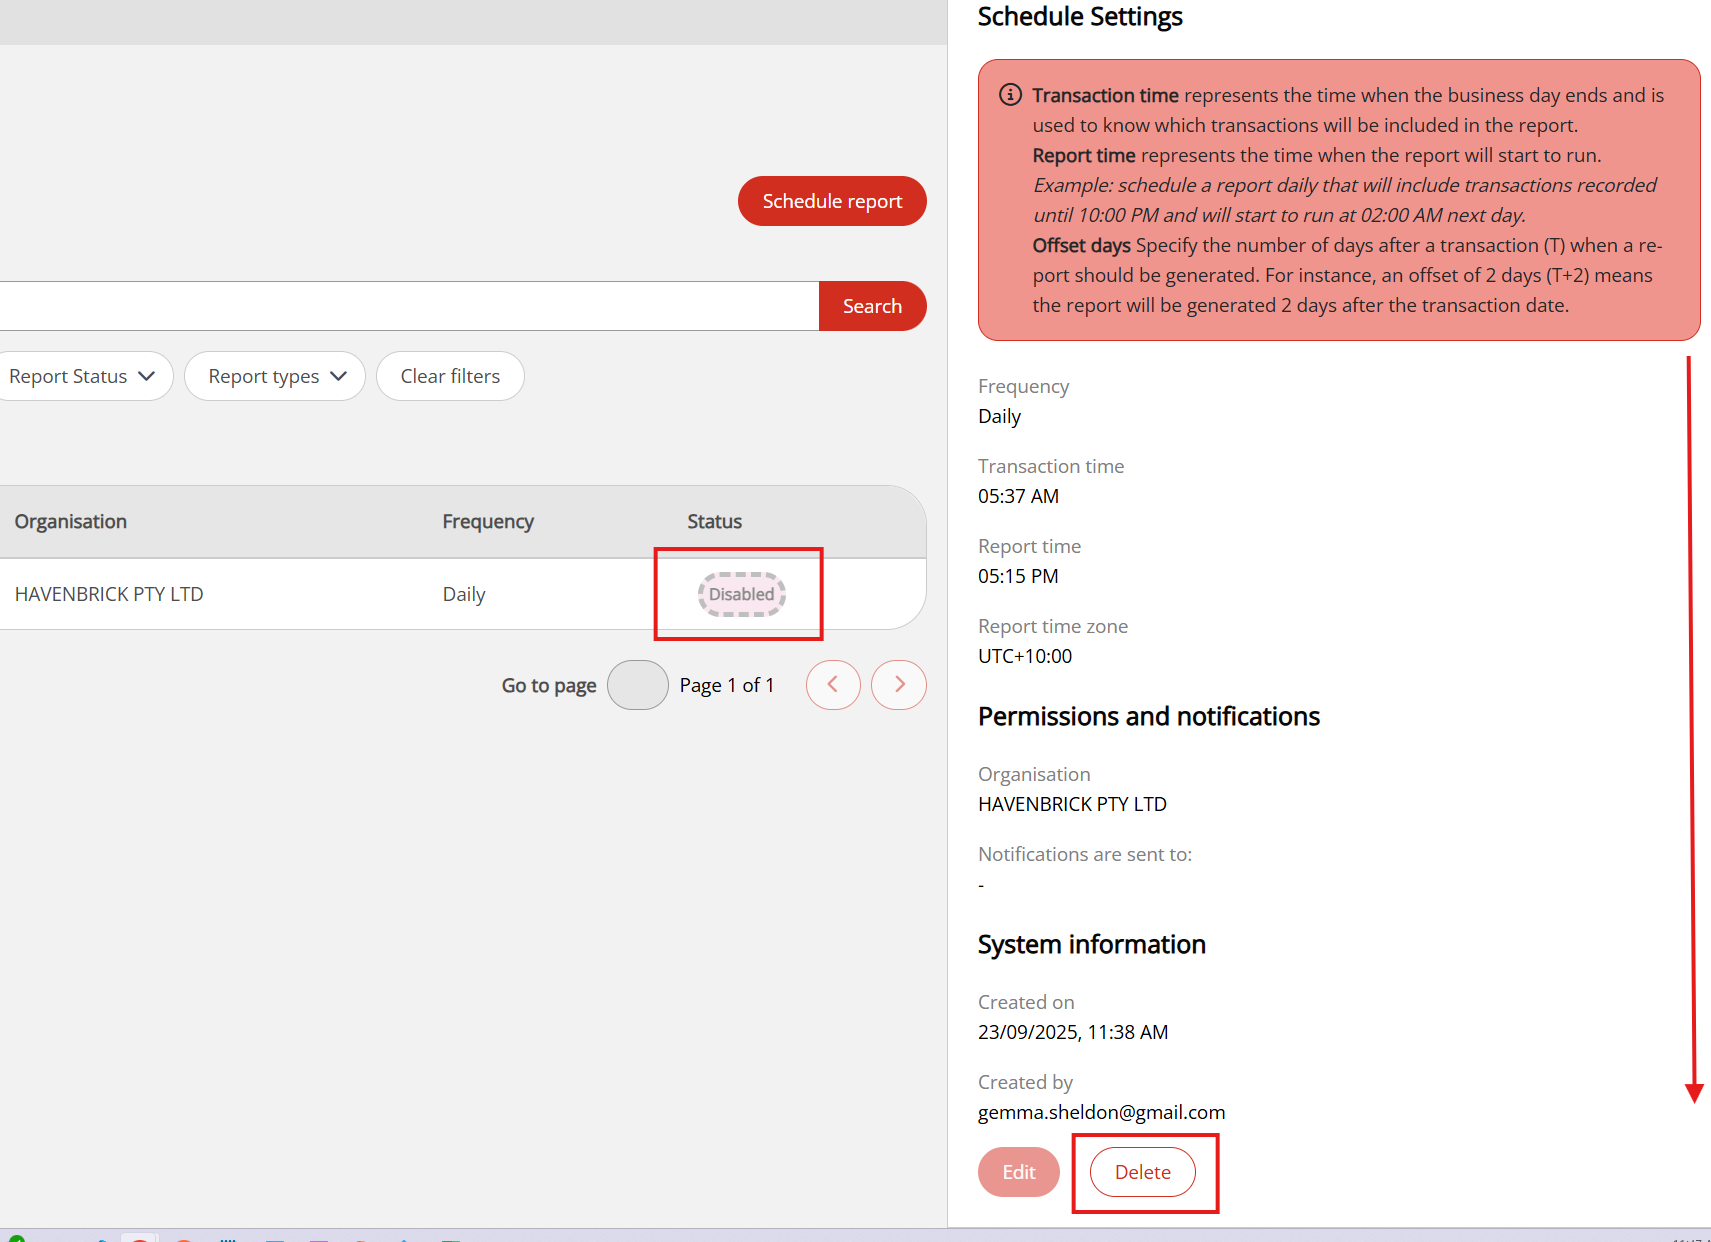
At the top of the report details panel, toggle the switch to
DisabledorEnabledto change the status of the report.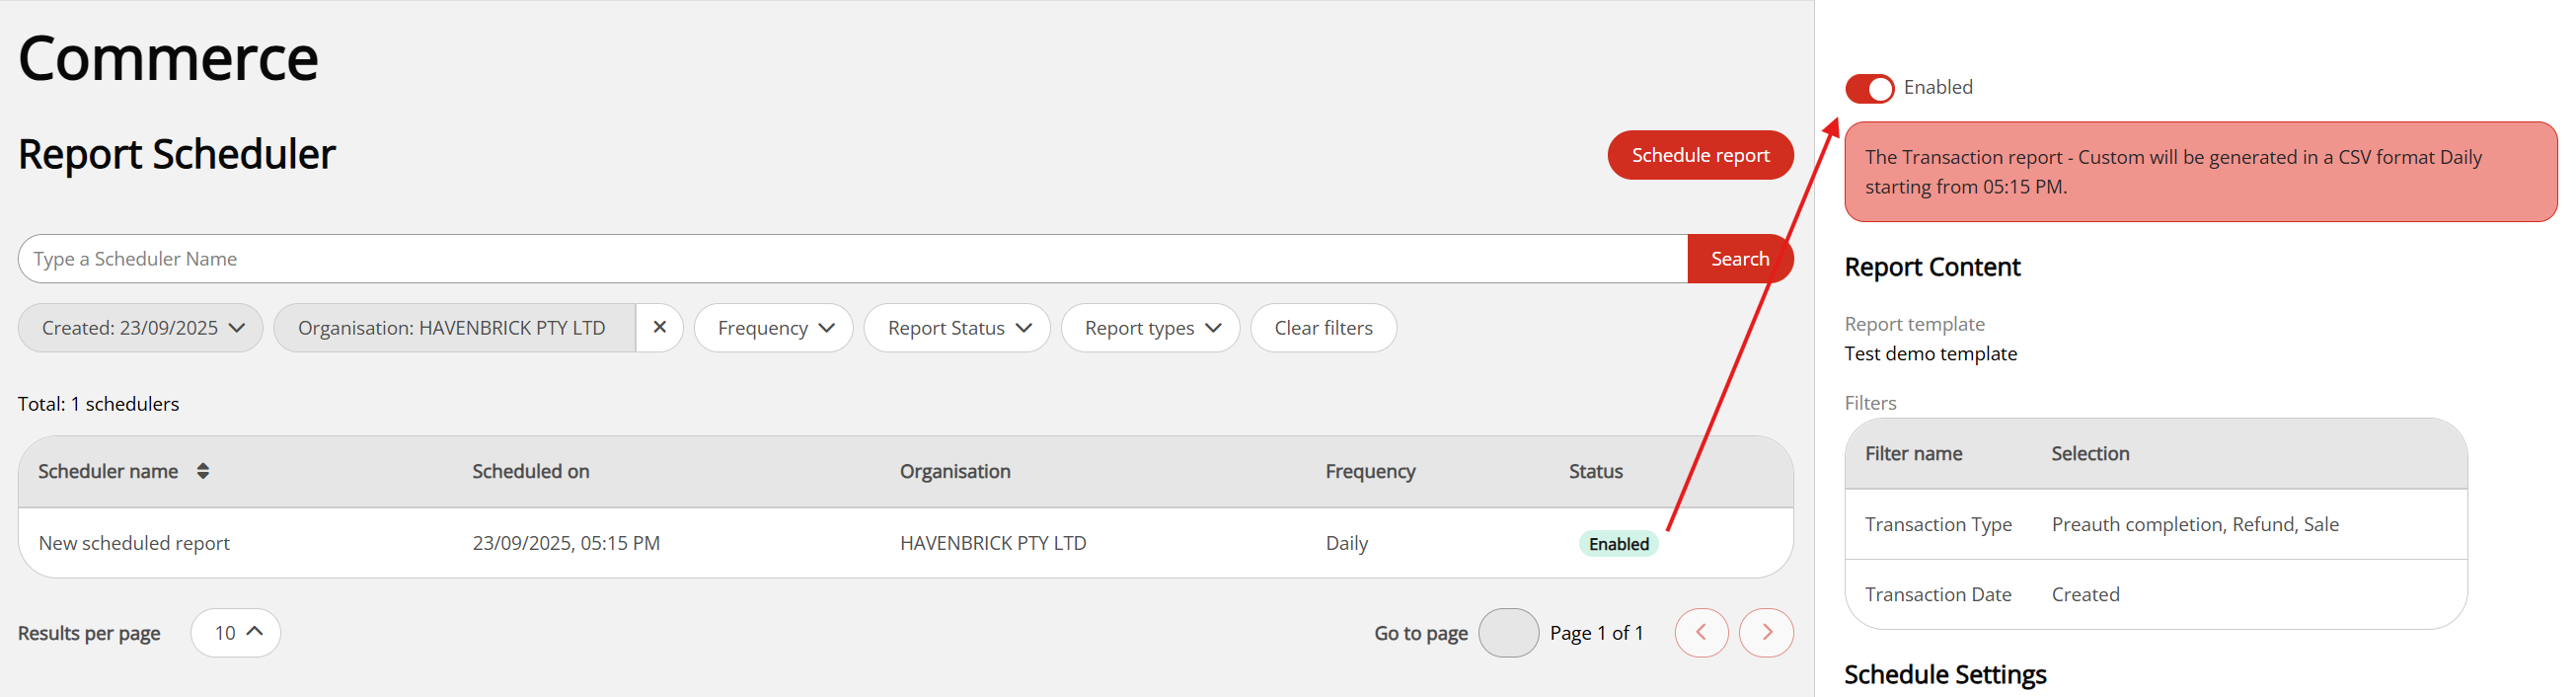

- When a report is disabled, it will not be generated or sent until it is re-enabled.
- When a report is enabled, it will be generated and sent according to the specified schedule.
Delete a scheduled report
You can delete a scheduled report regardless of whether or not it is enabled to remove it from the list of scheduled reports. Deleting a report that is enabled will also stop it from being generated and sent. This cannot be undone.
-
In your OnlinePay dashboard, navigate to Commerce > Reporting > Report Scheduler.
-
Locate the scheduled report you want to delete in the list of scheduled reports and click it to open the scheduled report details.
-
Scroll to the bottom of the report details panel, then click Delete. The report will be removed from the list of scheduled reports.
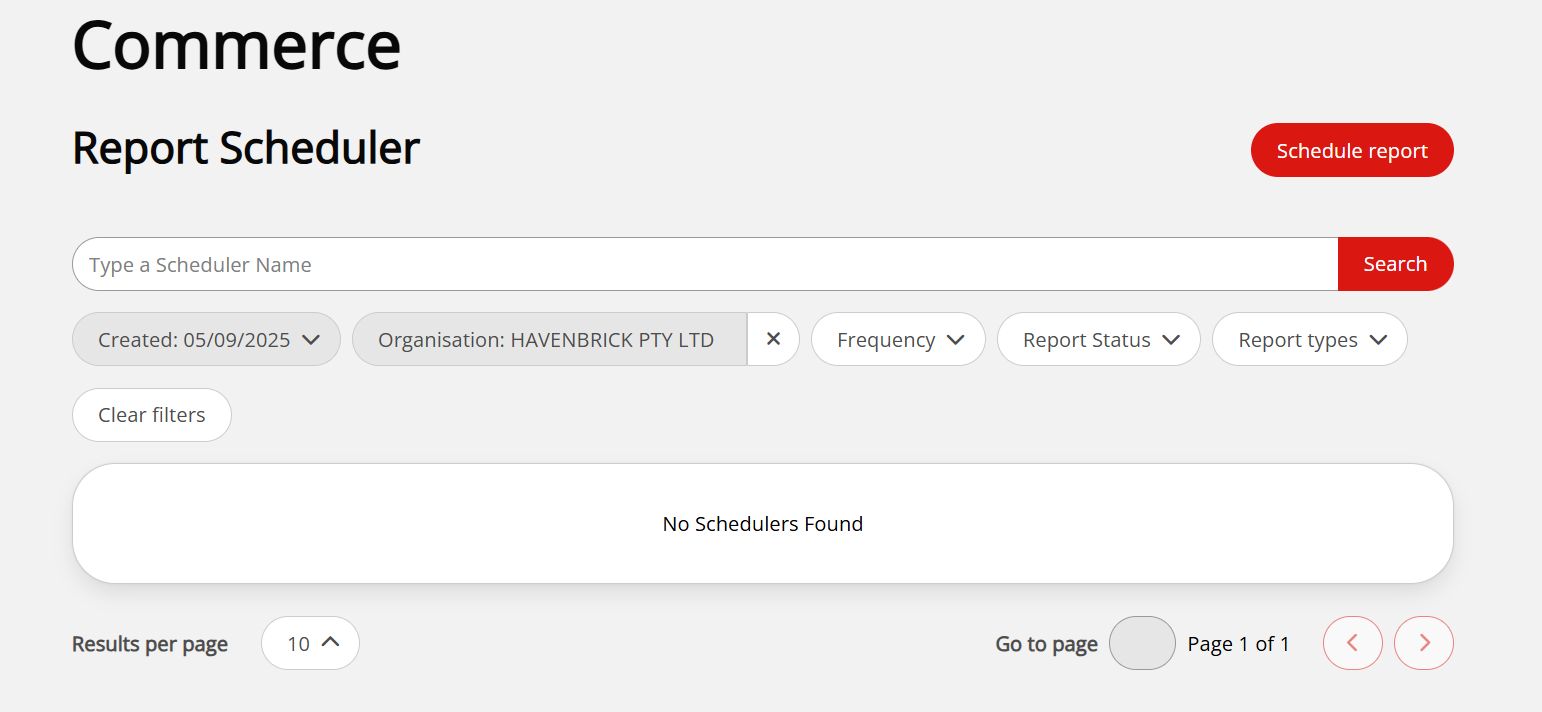
Search and filter scheduled reports
To search for a specific scheduled report, use the search bar at the top of the list of scheduled reports to search by the name of the scheduled report, or alternatively you can use filters.
- In your OnlinePay dashboard, navigate to Commerce > Reporting > Report Scheduler.
- (Option) If you know the name of the scheduled report or part of the name, enter it in the search bar at the top of the list of scheduled reports, then click Search. A list of scheduled reports matching your search criteria will be displayed.
- (Option) Use the following filters to narrow down the list of scheduled reports:
- Created: Filter reports by the creation date. You can select a specific date or range from the current day to a future date to view scheduled reports that will be created within that date range.
- Organisation: Filter reports by the organisation associated with them.
- Frequency: Filter reports by their reporting frequency. You can select one or more frequencies (
Daily,Weekly,Monthly) from the list. - Report status: Filter reports by their current status. You can select one or more statuses (
Enabled,Disabled) from the list. - Report types: The template used for the report. You can select one or more report types from the list. You can reset the filters at any time by clicking Clear filters.
- Click Apply on any of the filter drop-downs to apply the selected filter(s). The list of scheduled reports will be updated to reflect the applied filters.
Updated 5 months ago