

Tokenisation
Overview
Tokenisation replaces sensitive payment information, such as credit card numbers or PANs (Primary Account Number), with a unique non-valuable number known as a token. This allows you to store payment details securely for your repeat customers or for subscription-based services without handling sensitive data directly.
When a token has been created, it can be used in place of the original payment information for future transactions. Tokens cannot be changed back into card numbers (PANs) and can only be used by the merchant that created them. Merchants can store tokens in their system and send the token to the OnlinePay gateway for processing payments.
Token scopes are used to limit the validity and type of generated tokens. To use tokenisation, you must have access to the OnlinePay dashboard, with an organisation that has an active Payment Provider Contract. Token scopes are linked to a specific organisation, and any individual token is only valid within the token scope it was created.
Token types
Token types define how tokens can be used. OnlinePay supports the following token types:
- Reuse token: A reuse token can be used and stored for a payment method that can be reused for future payments and refunds.
- Analytics token: An analytics token allows linking card data to a token that can identify cardholders across sales channels, for example, the same PAN attached to both a physical card and a digital wallet. It can be used and stored for performing group transactions with the same PAN.
Create a token scope in the OnlinePay dashboard
Use the following procedure to create a token scope in the OnlinePay dashboard. Once you've created a token scope, you can use it to generate tokens via the OnlinePay APIs or Checkout.
-
Log in to the OnlinePay dashboard.
-
Navigate to Administration > Organisations.
-
Select the organisation at the
Merchant Companylevel that you want to create a token scope for. -
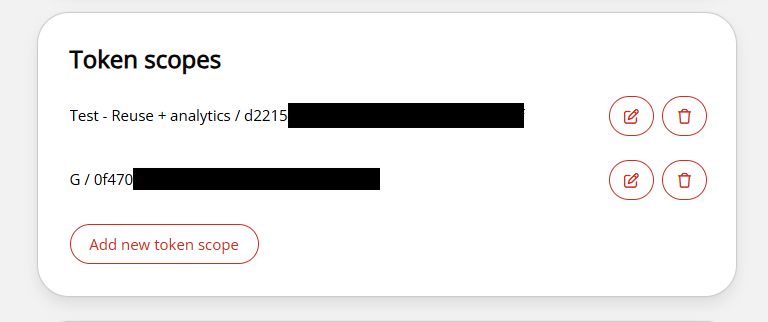
Scroll down to the Token Scopes section and click Add new token scope. This opens a new Create token scope form on the page.
-
In the Create token scope form, enter the following details:
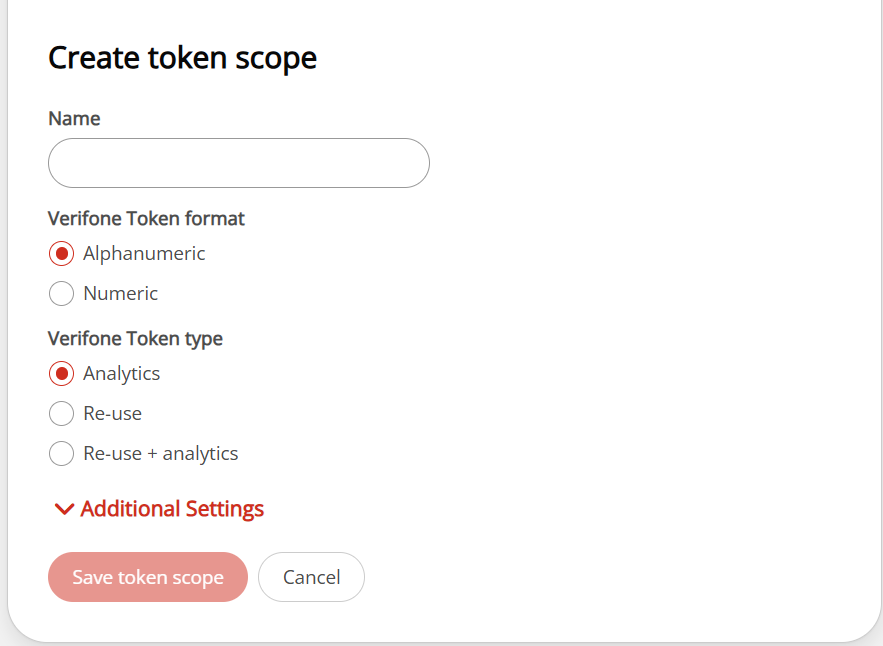
- Name: Enter a name for the token scope for easy identification. This will appear in the dashboard, followed by the token.
- Verifone Token format: Select your preferred token format. This selection only affects reuse tokens, as the analytics token has a fixed format, 29-digits:
{name} + {27 digit alphanumeric string}.
The available options are:Alphanumeric: An alphanumeric token format that includes both letters and numbers.Numeric: A numeric token format that includes only numbers.
- Verifone Token type: Select the token type you want to create:
Analytics: An analytics token that can only be used for analytics purposes.Re-use: A reuse token that can be used for future payments and refunds.Re-use + analytics: A token that can be used for both reuse and analytics purposes. If you select this option, two token values will be returned in one response.
-
(Optional) Configure Additional Settings to modify the technical details of the reuse token only, such as format-preserved tokens. Default settings will apply if you do not modify these options:
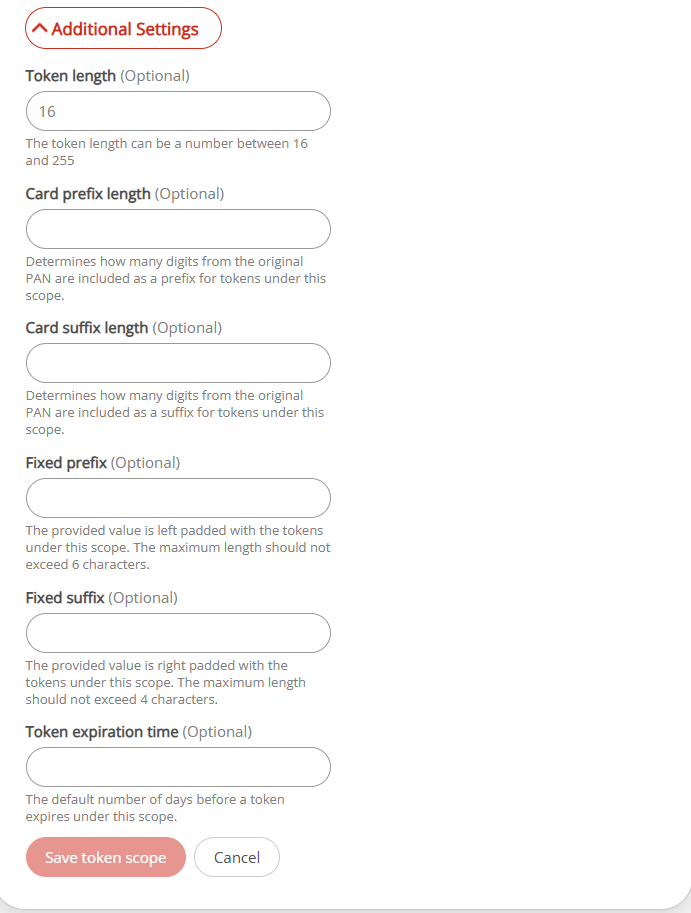
- Token length: The token length between 16 and 255 characters.
- Card prefix length: The number of digits from the start of the PAN to be included as a prefix for all tokens created in this scope.
- Card suffix length: The number of digits from the end of the PAN to be included as a suffix for all tokens created in this scope.
- Fixed prefix: The provided value is left-padded to the token length after the card prefix is applied. The maximum length cannot exceed six characters.
- Fixed suffix: The provided value is right-padded to the token length after the card suffix is applied. The maximum length cannot exceed four characters.
- Token expiration time: The duration (in days) after which the token will expire. The default is
365days. The maximum value is2000days.
-
Click Save token scope to save the new token scope. The new token scope will appear in the Token Scopes section of the organisation page.
Linking a token scope to a payment method in the OnlinePay dashboard
After you have created a token scope, you can link it to a merchant site in the OnlinePay dashboard. The merchant site is the point of sale where the payment method is used, such as a website or mobile app. Linking a token scope to a payment method allows you to generate tokens for that payment method when customers make payments on the merchant site.
-
Log in to the OnlinePay dashboard.
-
Navigate to Administration > Organisations.
-
Click the
Merchant Sitewhere you want to link the token scope. -
Scroll down to the Linked token scopes setion and click Link new token scopes. This will show the available token scopes that can be linked to the merchant site.
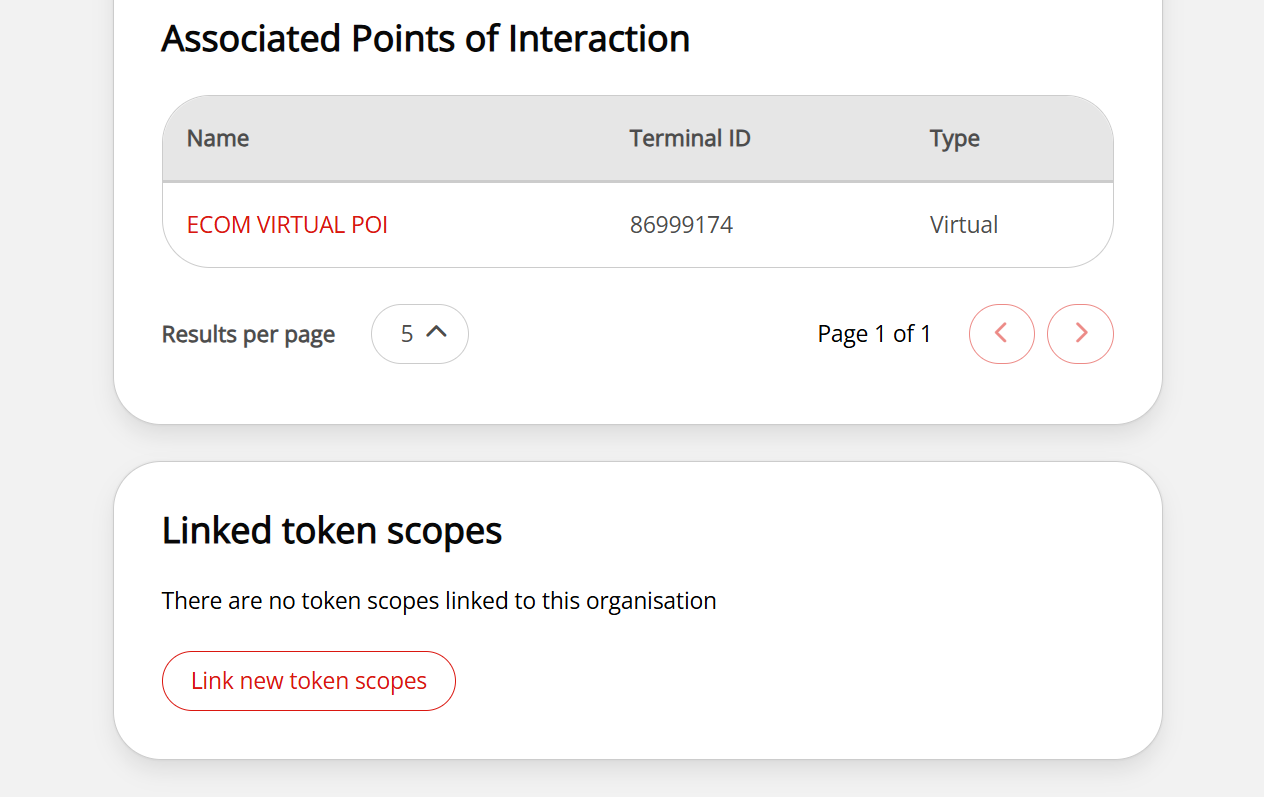
-
Select the token scope you want to link to the merchant site.
You can link multiple token scopes to a single merchant site if needed, however, you can only request one token scope per payment method during token generation.
-
Click Save token scopes to save the changes. The linked token scopes will appear in the Linked token scopes section of the merchant site page.
To remove a linked token scope, click the trash icon next to the token scope in the Linked token scopes section and confirm the removal.
Removing a linked token scope does not delete the token scope itself, it only unlinks it from the merchant site. Tokens generated using the unlinked token scope will be deleted and can no longer be used for payments or refunds.
Requesting a token via the OnlinePay APIs
You can request a token using the OnlinePay APIs once a token scope has been linked to an organisation. Tokens can be requested using the token_preference object on the following API endpoints:
- Create Checkout
- The eCommerce API:
By including the token_preference object in your API request, you can specify the token scope and other preferences for the token you want to generate. When the request is processed, the response will include the generated token based on the provided preferences. This token can then be used for future transactions as needed.
"token_preference": {
    "token_scope": "string",
    "encrypted_card": "string",
    "token_type": "string",
    "token_expiry_date": "string",
    "public_key_alias": "string"
}| Parameter | Description |
|---|---|
token_scope | (required field) - refers to the token scope UUID under which the token is created |
encrypted_card | (required field) - refers to the cardholder data encrypted using the Verifone provided public key (only in the Create/Update Token Details request) |
token_type | (optional field) - allows you to optionally limit which type of token(s) you would like to receive as a response to this call |
token_expiry_date | (optional field) - allows you to optionally limit the expiry date of the token you want to receive as a response to this call |
public_key_alias | refers to the public key the cardholder data is encrypted with (only in the Create/Update Token Details request) |
The generated token can be requested via the OnlinePay API or viewed in the OnlinePay dashboard under the transaction details for payments made using the token.
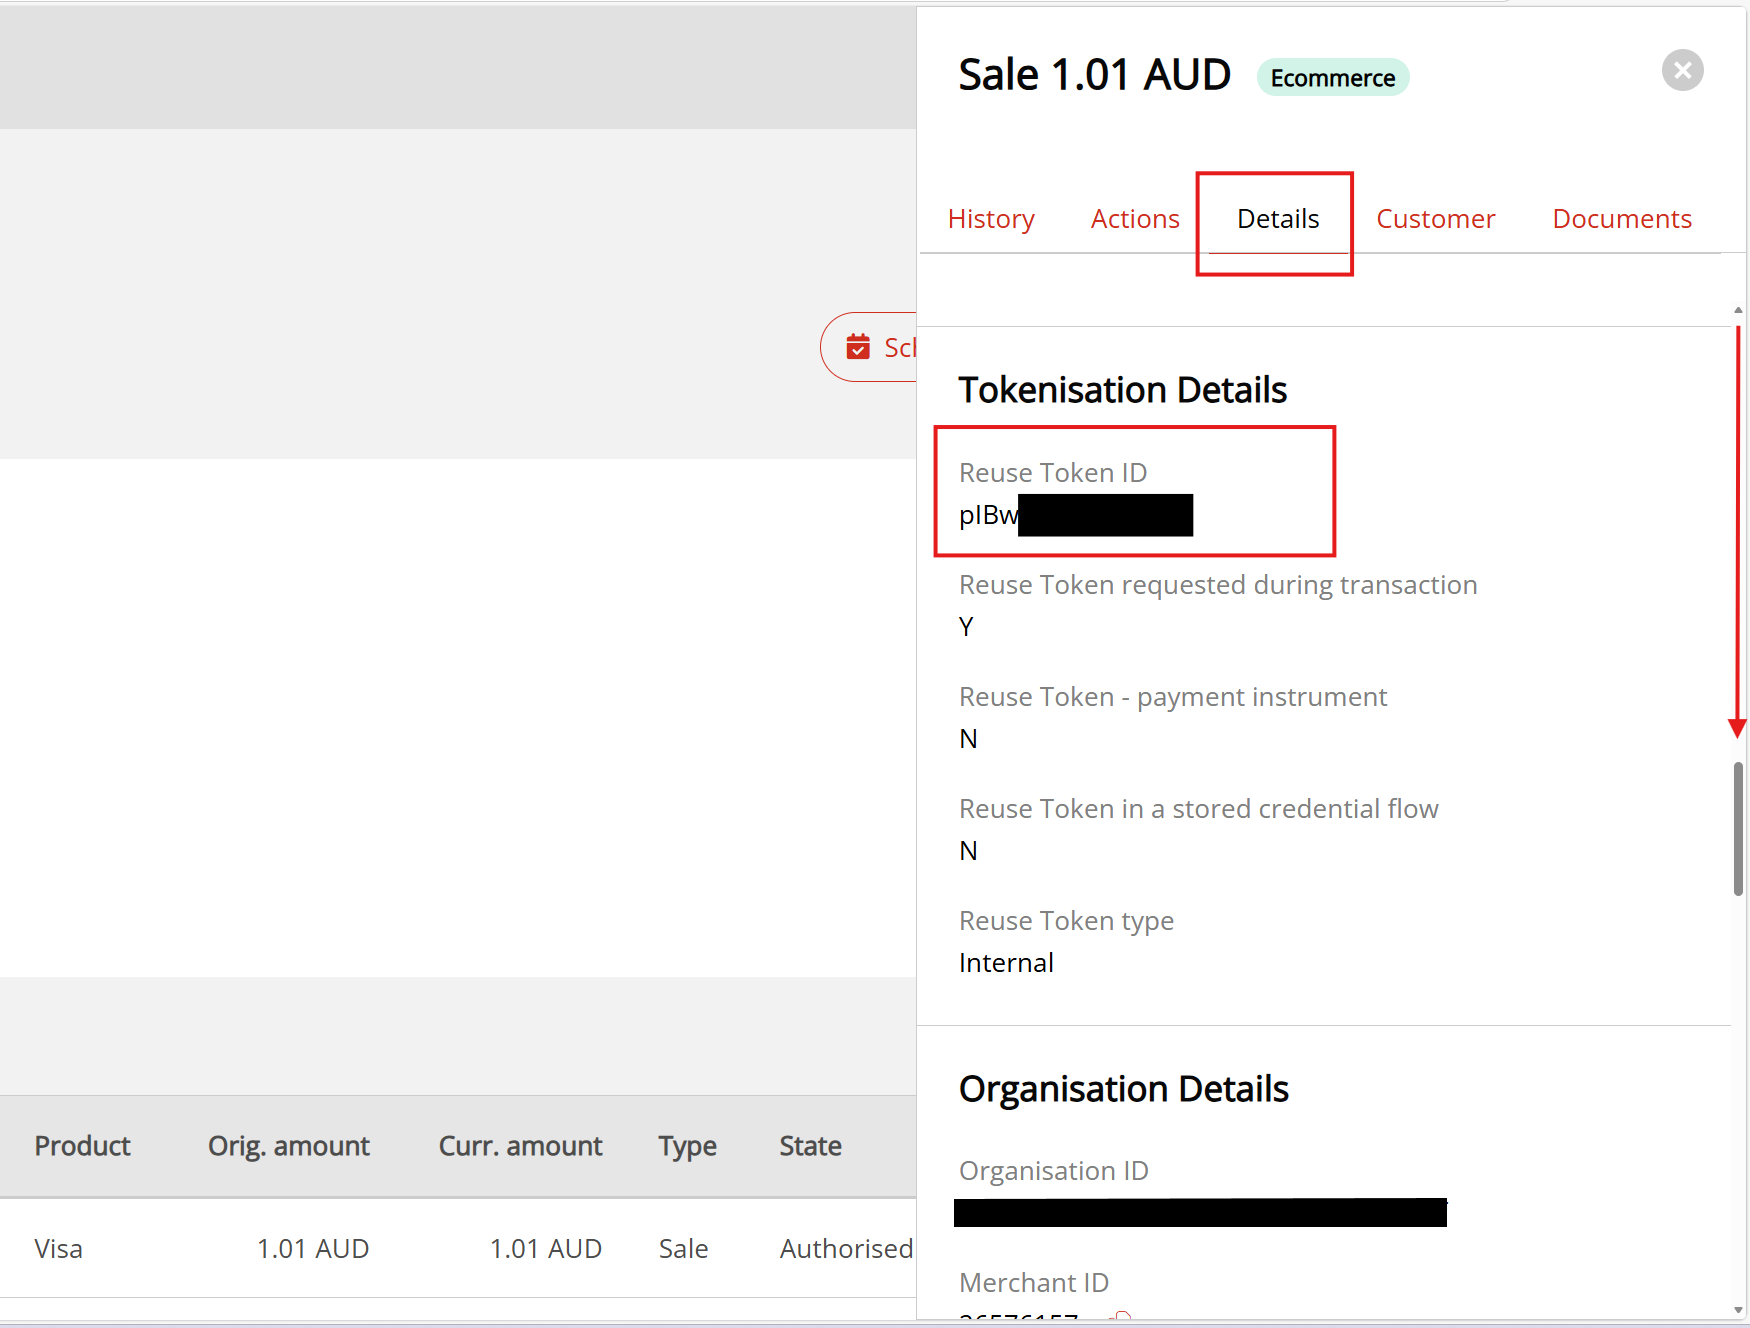
Retrieving token details
When the token has been created via one of the above methods, you can retrieve the token via the OnlinePay dashboard.
The token details appear on the transaction details page for tokens generated using the Checkout or eCommerce APIs for payments. To view the token details:
- Log in to the OnlinePay dashboard.
- Navigate to Commerce > Reporting > Orders/Transactions.
- Select the transaction that contains the token you want to view.
- Open the Details tab and scroll to the Tokenisation Details section to view the token information.
There is no way to view all of the available tokens at once. Therefore, we recommend storing the tokens in your system when they are created for future reference. There are two other ways to retrieve token details after they have been created:
- If you know the encrypted card details, you can submit a
PUT /createUpdateTokenrequest with the same encrypted card data to retrieve the associated token. - If the merchant knows the transaction UUID associated with the transaction that originally resulted in a token, you can search for the transaction in the OnlinePay dashboard and locate it on the Details tab as described above.
Taking a payment using a reuse token
Once you have a reuse token, you can use it to take payments without needing to handle sensitive card data. To take a payment using a token, include the token in your POST /transactions/card token payment request.
When making a payment request, include the reuse_token object in the request body, specifying the token value and any other required details. The OnlinePay gateway will process the payment using the card details associated with the reuse token.
Example payment request using a reuse token
{
    "payment_provider_contract": "{{paymentContract}}",
    "amount": 5000,
    "currency_code": "{{currency}}",
    "reuse_token": "{{visaReuseToken}}"
}
A successful payment response will include the transaction details, confirming that the payment was processed using the reuse token.
{
    "id": "1a2b3c4d-5e6f-7g8h-9i0j-k1l2m3n4o5p6",
    "payment_provider_contract": "{{paymentContract}}",
    "amount": 5000,
    "blocked": false,
    "payment_product": "CARD",
    "processor_reference": "123456789012",
    "status": "AUTHORIZED",
    "authorization_code": "3333333",
    "created_by": "11111111-2222-3333-4444-555555555555",
    "cvv_result": "0",
    "stored_credential": {},
    "details": {
        "auto_capture": true
    },
    "reason_code": "0000",
    "rrn": "123456789012",
    "shopper_interaction": "ECOMMERCE",
    "stan": "000111",
    "reversal_status": "NONE",
    "additional_data": {
        "acquirer_response_code": "00",
        "initiator_trace_id": "000451",
        "settlement_date": "2025-12-16",
        "acquirer_response_message": "Approved or completed successfully"
    },
    "promo_financing_result": {},
    "card_details": {
        "masked_card_number": "41111111****1111",
        "expiry_year": 2027,
        "expiry_month": 8
    },
    "balance_amount": 0
}